Introduction
Over the last year, we have been taking our BRZ test vehicle to the track. During this time, the vehicle has had many performance upgrades, including our full catalogue of suspension components. While it already performed excellent on track, one of the greatest performance improvements came from the addition of a very impressive Alcon big brake kit. This investigation into anti dive geometry is largely borne from the addition of this big brake kit and the desire to extract the most performance possible out of our BRZ and its brakes.
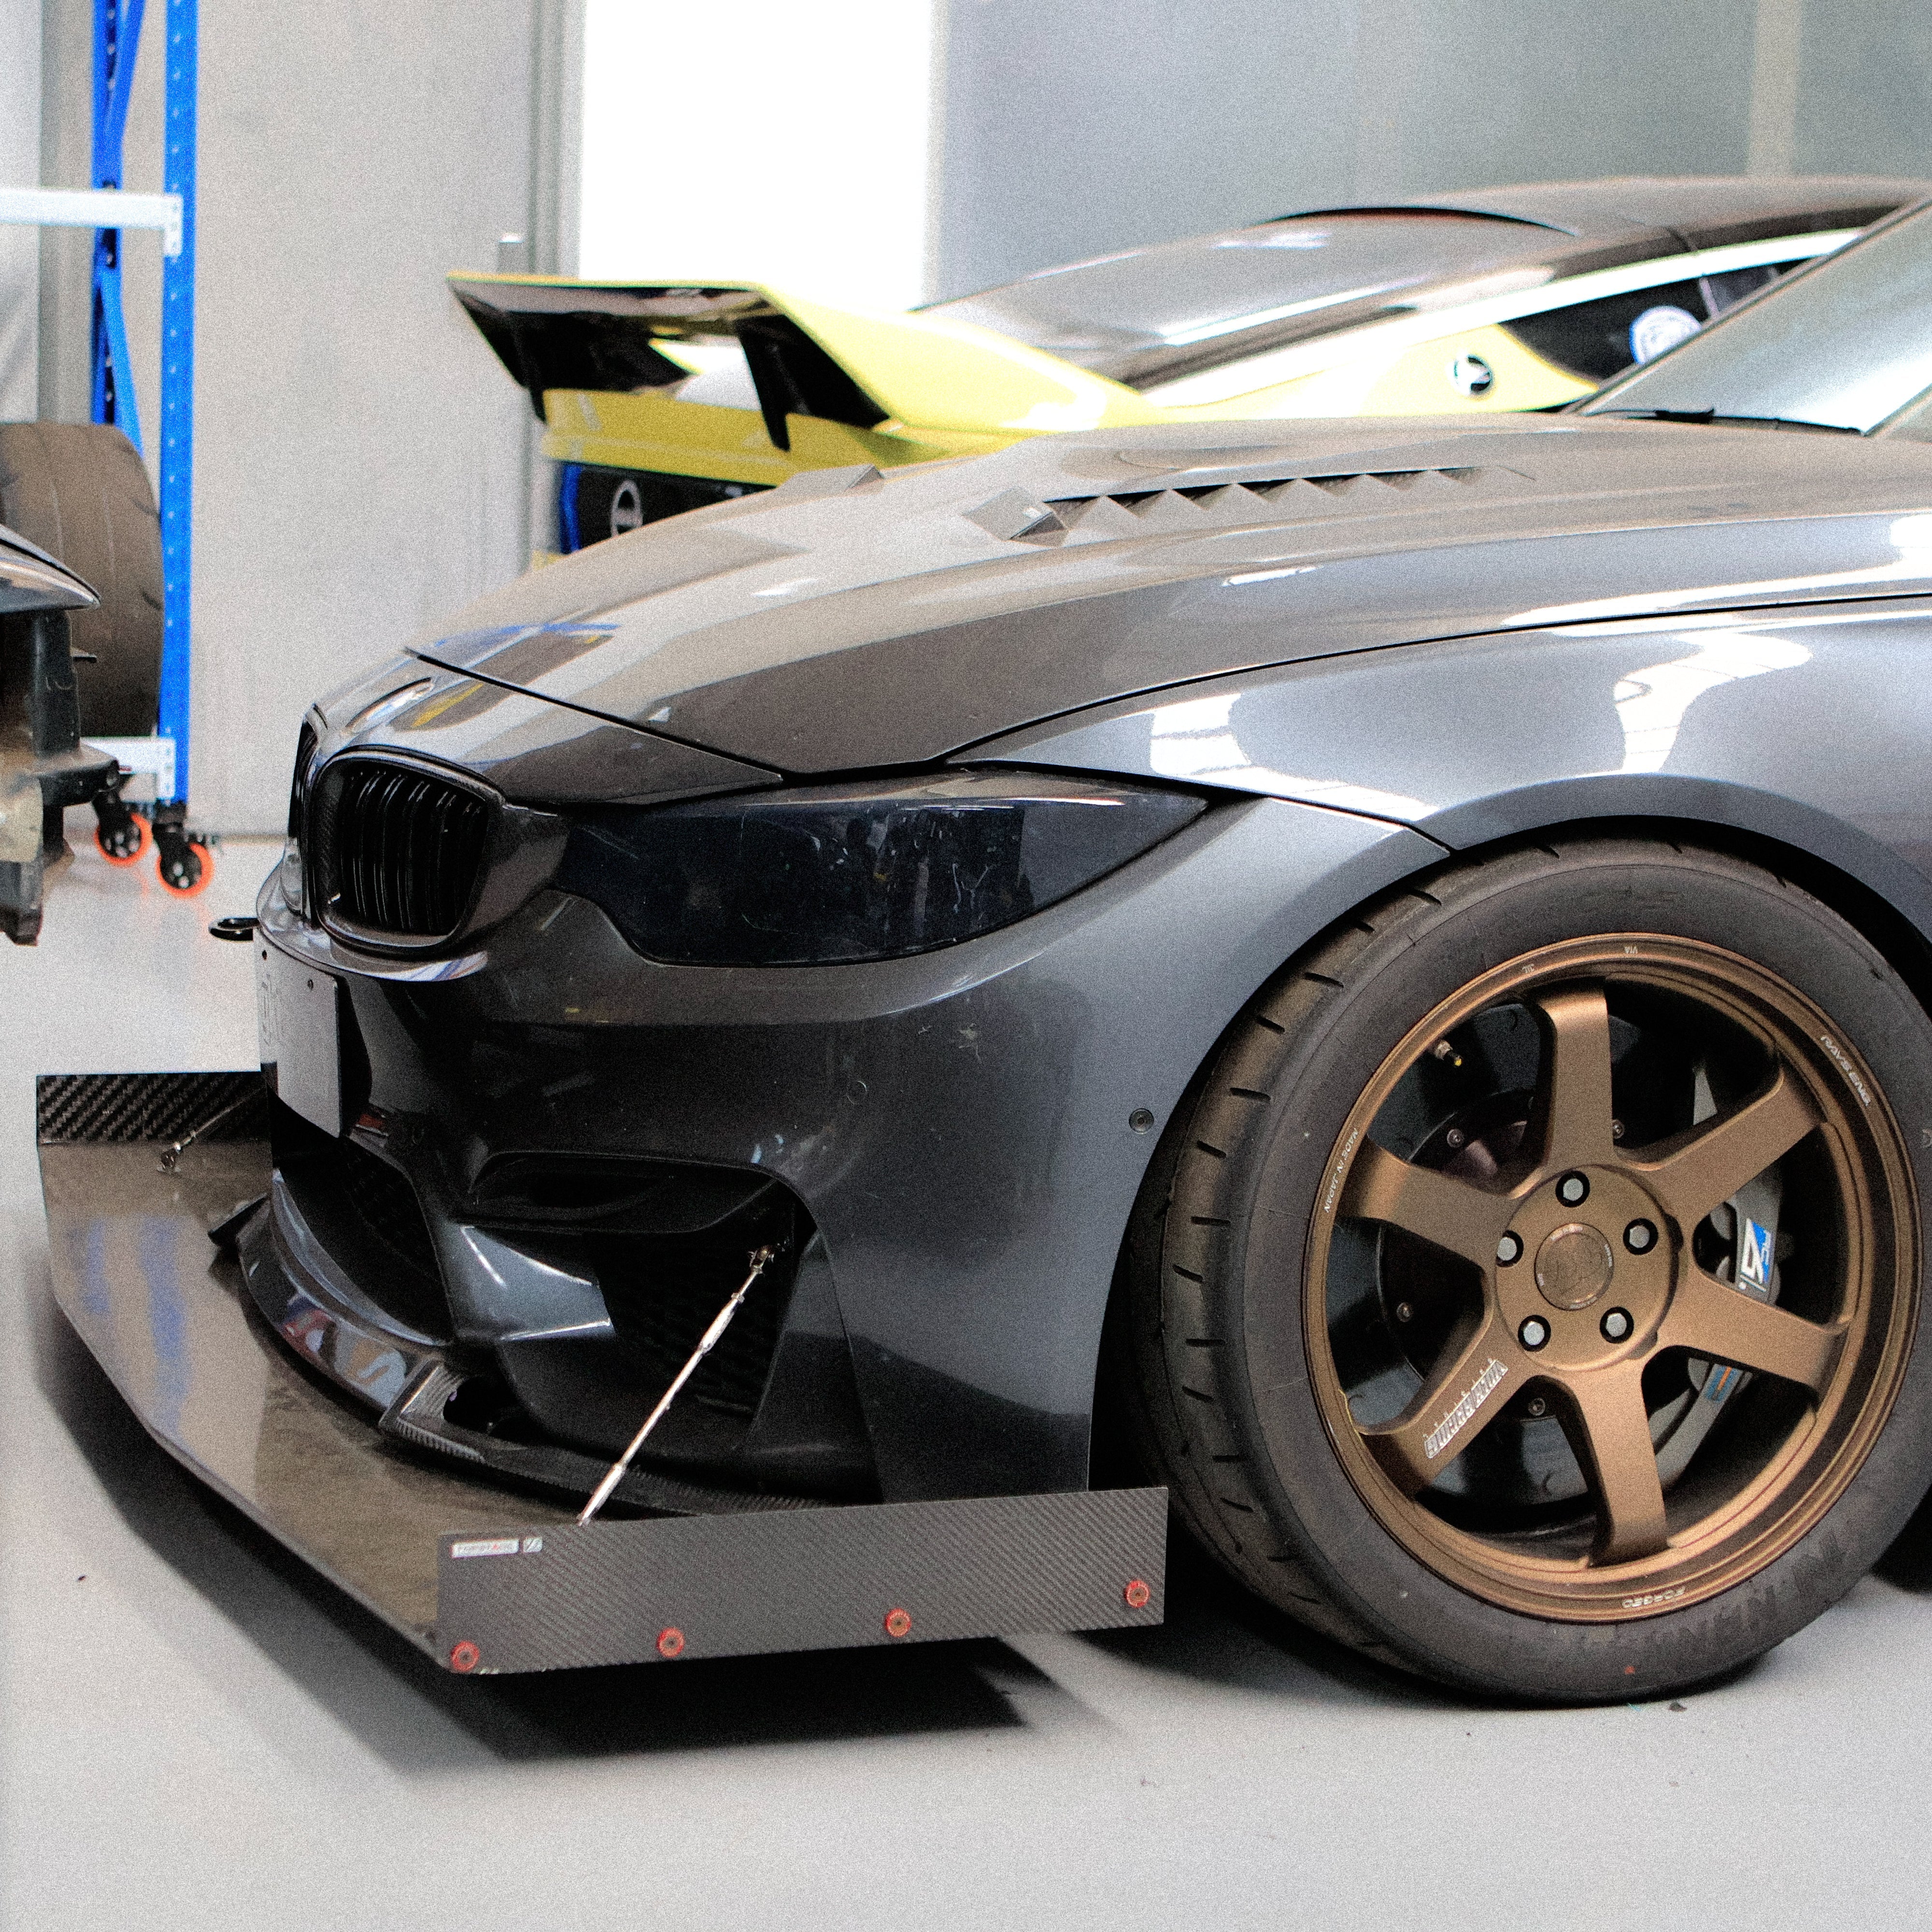
 Figure 1, GKtech Subaru BRZ
Understanding Anti Dive Geometry
What is anti dive and what does it have to do with brakes? Anti dive is a term used to describe a certain characteristic of suspension geometry. Much like camber gain or bump steer, anti dive is another term which can be determined by analysing the vehicle geometry. It then allows us to then predict how a vehicle will behave under certain conditions.
When a vehicle brakes, weight is transferred from the rear axle to the front axle. This weight transfer causes the front coilover to compress and the rear coilover to extend. This is felt by the driver as the nose of the vehicle “diving” or pitching. This forms the origin of the term anti dive. As the name would suggest, vehicles equipped with anti dive suspension geometry measure less of a pitching angle for the same given braking test.
Typically, under a hard braking event, the camber gain for the front suspension causes the negative camber on the front tyres to increase as the coilovers compress. This reduces the contact patch with the road and limits braking performance. By adding anti dive to a vehicle, the front coilover travel under braking is reduced which allows contact patch angle to the road to be improved, which in theory should improve the braking performance. The way in which anti dive geometry reduces this pitching angle is by passing some of the weight transfer through the suspension arms instead of the coilover. Because part of the vertical load is passed along the suspension arms instead of the coilover, there is less force to compress the coilover and pitch the vehicle. Anti dive is measured as a percentage, with 100% anti dive stopping all compression of the front coilovers due to braking. So, why not run 100% anti dive geometry on every car?
There are some serious downsides to passing too much of this vertical load through the suspension arms. We have springs and dampers for a reason, they decouple the sprung mass of the vehicle chassis from the harsh vibrations the tyre experiences when following the bumps in the road. One of the roles of a performance coilover setup is to attempt to keep the vertical load at the contact patch consistent regardless of the small bumps in the road to ensure it continues to perform at its peak grip level. By introducing anti dive, we are limiting the capability of the coilover to even out these load variations. Too much anti dive and the load variations will become too much for the tyre to handle and performance will drop off considerably.
“This effectively limits the amount of anti dive that can be built into any racing car to about 30%-and that only in heavy front engined cars.” – Tune to Win - Carroll Smith
So, as with all things in suspension design, while there are performance benefits to be found, too much anti dive is most definitely not desirable. Anti dive percentages can be calculated geometrically using instantaneous centre lines; however this calculation is outside the scope of this blog post.
Adding Anti Dive on the FRS / BRZ / GT86
Taking it back to our BRZ, when analysing the suspension geometry, we found that the OEM suspension geometry at OEM ride height has a very low anti dive value. At static OEM ride height this value is -4% with it increasing up to +8% at 60mm of bump travel. The reason for the low anti dive here is that when the car is travelling along a road and hits a bump, the suspension is right around the 0% anti dive value. This ensures that a maximum amount of vertical force can pass through the spring and damper and not through the suspension arms. The dampers can then do their job to mitigate the vibrations and result in the best possible NVH (Noise, Vibration and Harshness) characteristics.
It is also advantageous to have the anti dive gradient arranged this way, so that as the car brakes, and the front suspension compresses, the anti dive value also increases to limit the total pitch angle of the car under brakes. In this way, the OEM design makes use of anti dive to limit the pitch angles somewhat, while retaining the best possible NVH performance. However, in a track focused environment, we are less concerned about the vibrations and more concerned with braking as late as possible to shave some more tenths off our lap time. So, by increasing the anti dive value on our BRZ, we expect to be able to further improve the vehicle braking performance.
In order to change the anti dive value of the BRZ, the position of the suspension mounting points must be changed. We found that the easiest way to do this was by lowering the leading mounting point of the front lower control arm. This turned out to be a simple modification due to the fact that the OEM subframe already has a vertical stud in this location. By replacing this stud with a longer bolt and some spacers and replacing the OEM lower bracket for one with an offset, the anti dive value can be fine tuned by simply stacking the spacers above or below the arm mounting point. This can be seen below in figure 2 where spacers have been installed above the arm to lower the chassis mounting point by 20mm.

Figure 2, Anti dive kit installed in combination with GKtech FLCA
Tuning Anti Dive on your car!
Figure 3 illustrates the increase in anti-dive percentage from the OEM configuration up to the maximum modification of a 20mm change in the lower control arm mounting point. These incremental changes, in 5mm adjustments, yield significant changes to the anti dive.
For a vehicle that is lowered 50mm, note that the static anti dive value will already be higher due to the lowered suspension geometry. To illustrate this, look at the vertical line for 50mm heave, and consider that as your static position. You will note that it is already 10-15% higher than the corresponding value at 0 heave. This means that if your vehicle is not at OEM height, you may require a smaller adjustment to achieve the desired change in anti dive.
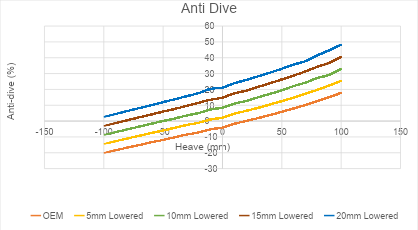
Figure 3, Anti dive vs Heave for tuning positions possible with our anti dive kit
As always when it comes to suspension geometry, rarely can you make a change in one area without affecting another. The next graph of significance is the effect that the modified anti dive has on the bump steer characteristics. In figure 4, it can be seen at the 20mm lower mounting point (max anti-dive) the bump steer begins to toe-in in bump after around 50mm of heave travel. However, this does not pose reason for great concern. Yes, the bump steer curve has been fairly significantly altered by this position, but the outcome is a curve that is very calm and actually results in less toe change than the OEM setup. All vehicles and drivers will have slightly different setup requirements, however, this change won’t make the car undrivable.
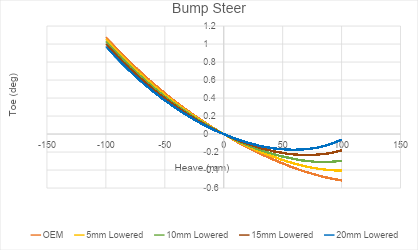
Figure 4, Toe vs Heave values for tuning positions possible with our anti dive kit
Additional checks have also been conducted on the camber, caster and roll centre heights. These showed minimal changes for the different anti dive settings and they are not significant enough to warrant discussion. Please see the following as starting points for setting your anti-dive.
OEM Height
For a vehicle that is at OEM ride height, we would recommend targeting an anti dive setting in the range of 10-20mm lowered. This will bring the anti-dive into the range of 7.5%-21% when at a static position. Due to the OEM ride height, the vehicle will seldom see bump travel in excess of 50mm and as such the fact that the bump steer curve begins to toe in after that point is of little concern.
Lowered Cars
Typically, a lowered car will sit in the range of ride height that is 30-50mm lower than OEM. Please use these graphs in conjunction with your own and judgement to determine if the following applies to you. For lowered cars, we recommend moving the pickup point down by 5-15mm. This will bring the anti-dive into the range of 12.5%-26% at static ride height. Anti dive values in this range should offer the best compromise of increased braking performance without greatly compromising tyre compliance.
After installing the anti-dive kit on your car, you may notice that its effect on your specific vehicle setup may be either less pronounced or more dramatic than anticipated. This is entirely normal, as the ideal anti-dive setting can vary depending on a range of factors, including your suspension setup, ride height, driving style, and the types of roads or tracks you frequent. Fortunately this kit is designed to be fine tuned. Once you have your starting point feel free to adjust your anti dive to find out which setting works best for you. The key is to make small, measured adjustments and evaluate how they affect your car's behaviour in real-world conditions. Through this process, you can find the sweet spot that delivers the best performance and driving experience for you.
Conclusion
Adjusting the anti-dive geometry on the front suspension of your FRS, BRZ or GT86 can provide significant performance gains through the improvement of braking performance. While the OEM setup strikes a balance between comfort and performance for road use, a moderate increase in anti-dive can offer meaningful advantages on the track by reducing front-end dive to enhance the tire contact patch during hard braking.
However, as with any suspension modification, it’s important to strike the right balance. Introducing too much anti-dive can compromise the suspension’s ability to absorb bumps and maintain tire compliance, leading to a rougher ride and reduced performance. Careful consideration of your vehicle’s ride height, driving style, and intended use will help determine the optimal anti-dive setting. Whether you're fine-tuning for track performance or just seeking improved braking stability on road, our kit enables incremental adjustments to the anti-dive values so that you can find the right settings for your vehicle and track.
With the right balance, you’ll unlock the full potential of your brake system and suspension, allowing for improved handling, stability, and ultimately, faster lap times.